
xCloud Deployment in Action: Jupyter Notebook with Docker, Cloudflare, and Nginx Reverse Proxy
In the previous article "Python – Building a Jupyter Notebook Cloud Development Environment" (Part 1), we completed the basic setup of a DigitalOcean Droplet. Following the traditional path, one would typically need to log in via SSH to manually handle Python environment variables, Virtualenv, and the tedious installation of Jupyter and firewall settings.
For quantitative traders or data scientists, having a Jupyter Notebook environment that is accessible anytime, anywhere, and has independent computing resources is a dream configuration. Especially when you need to conduct long-term options historical backtesting, or simply don't want heavy calculations to occupy your laptop's resources, a cloud environment is the best solution.
This is also why in our newly upgraded "Python Options Quantitative Trading in Action" course, we specifically recommend this solution for students to deploy their Strategy Lab.
However, the traditional SSH deployment method is tedious and full of pitfalls. This article will demonstrate how to use the xCloud panel combined with Docker technology to complete the setup of a Jupyter Notebook cloud environment on a DigitalOcean host in just 20 minutes, integrating Cloudflare SSL and Nginx reverse proxy to build an efficient and secure quantitative development platform.
Environment Preparation and Architecture Overview
Before starting, please confirm that you have an xCloud account and a DigitalOcean (or Vultr, Hetzner) account.
xCloud Free Plan → Self-hosted 1 server, 10 sites/apps
DigitalOcean Free Credit → 30 days, $300 USD
Vultr Free Credit → 2 months, $200 USD
This deployment uses a Docker containerization solution rather than installing directly on the Host OS. The reason is that xCloud is essentially a management tool optimized for WordPress and PHP applications, taking over the host's Nginx, PHP-FPM, and database settings. Installing a Python environment directly at the OS level might conflict with packages used by xCloud or even be overwritten during panel updates. Docker isolates the Jupyter environment, allowing us to enjoy the convenience of xCloud without interference.
Architecture Diagram
External Request (HTTPS:443) → Cloudflare (SSL) → Nginx managed by xCloud (Reverse Proxy) → Docker Container (Localhost:8888) → Jupyter Notebook

Step 1: Install Docker Environment via xCloud Commands
First, connect your DigitalOcean account in the xCloud backend and create a new Droplet via Create Server.
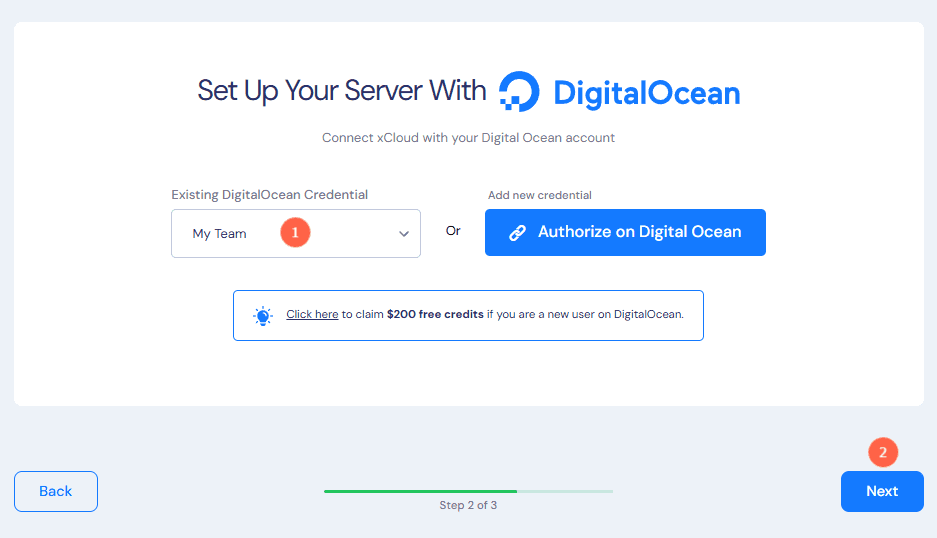
It is recommended to choose Ubuntu 22.04 LTS or 24.04 LTS version, with at least 2GB RAM to ensure smooth Python computation.
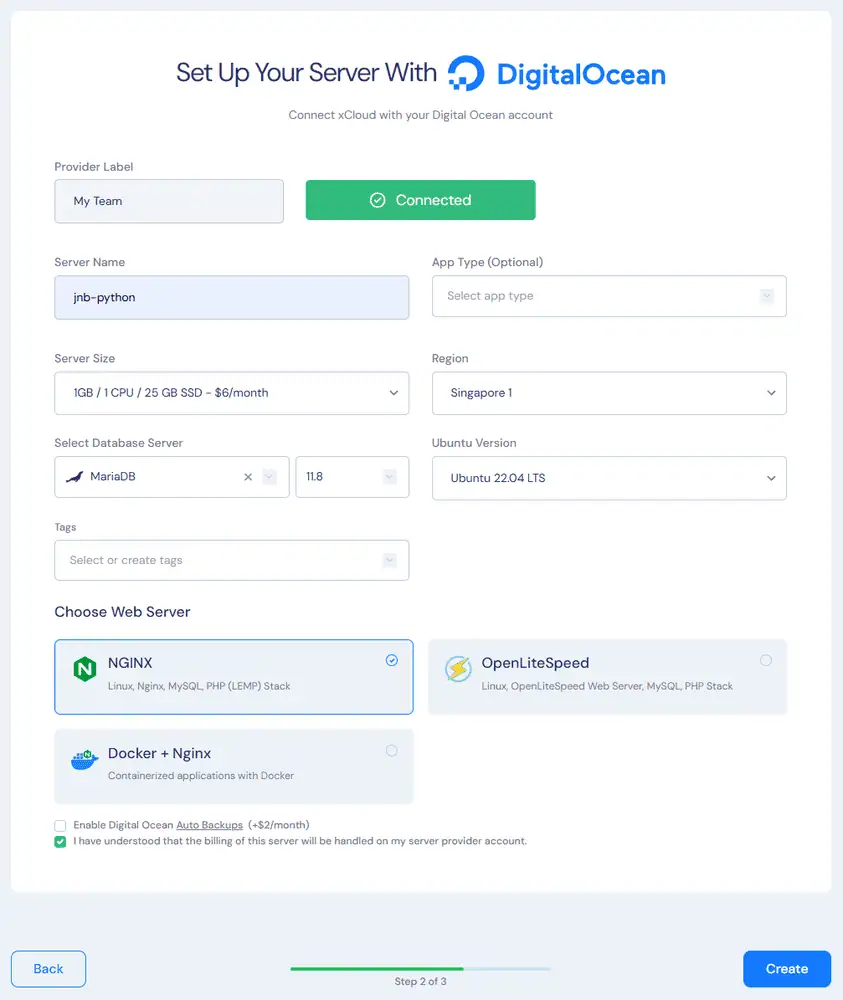
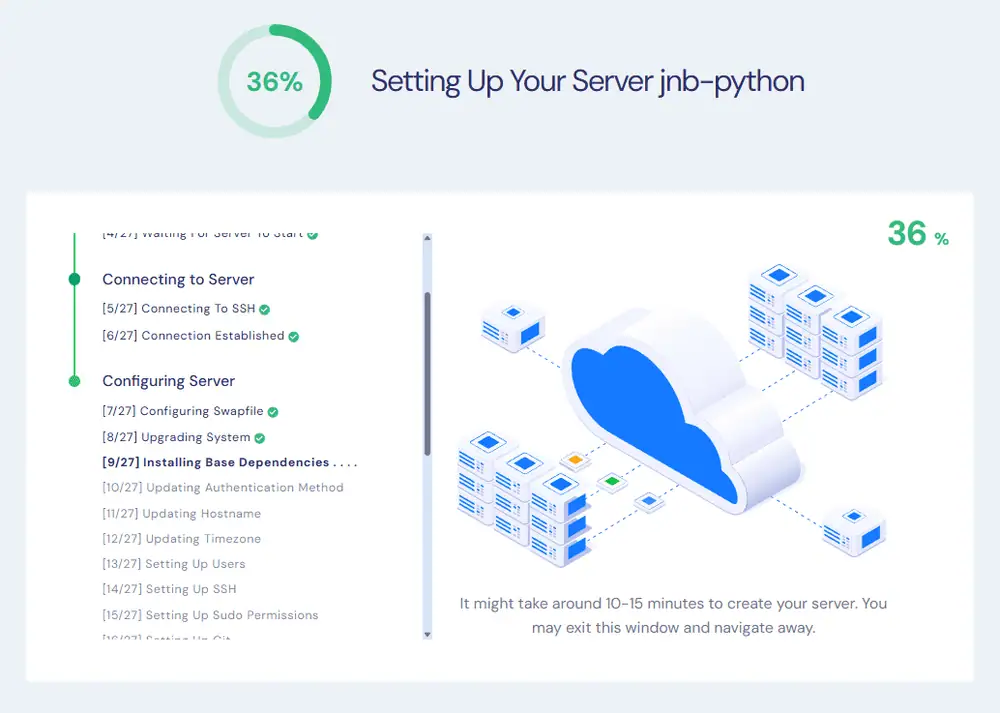
After the server is created, a reboot is required for security updates. Then, enter the server management interface. We no longer need to open Putty or Terminal; simply click Management → Commands in the left menu.
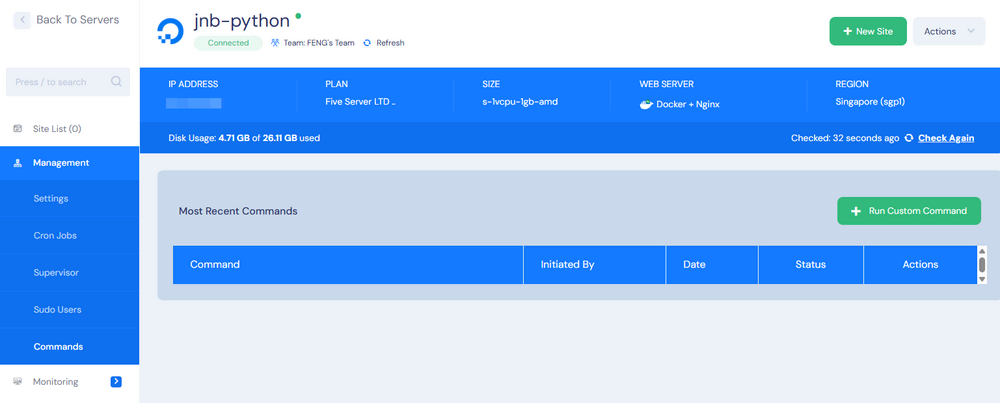
Execute Installation Command
Clicking + Run Custom Command will open the window below. Enter the following command in the Command content box, and the system will automatically download and install Docker:
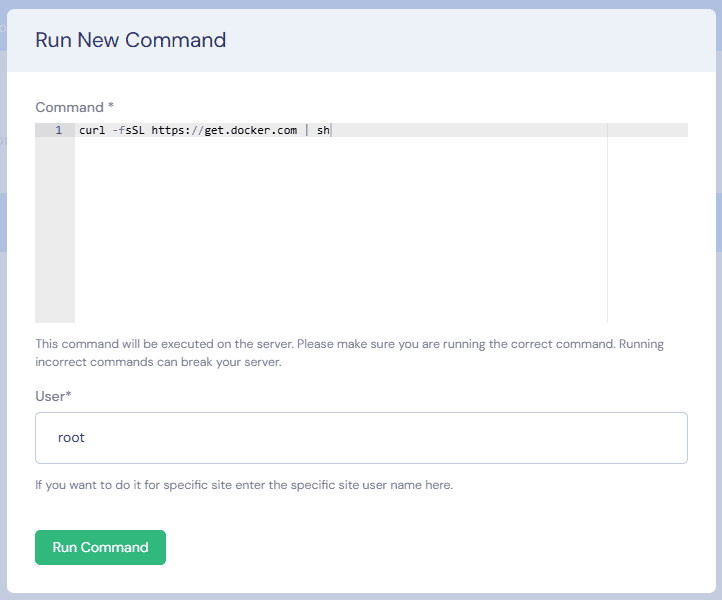
# Install Docker
curl -fsSL https://get.docker.com | sh

# Start and enable on boot
systemctl start docker
systemctl enable docker
Click Run Command, and xCloud will send the instruction to the server. When the Status shows Completed and the Action column's View result shows no error messages, Docker is ready.

Step 2: Deploy Jupyter Notebook Container
After Docker installation is complete, proceed to configure the network and storage space.
Configure Firewall Rules
From the left menu Security → Firewall Management, click Add New Rule to open Port 8888. This is to ensure the system can correctly identify the communication port inside the Docker container.
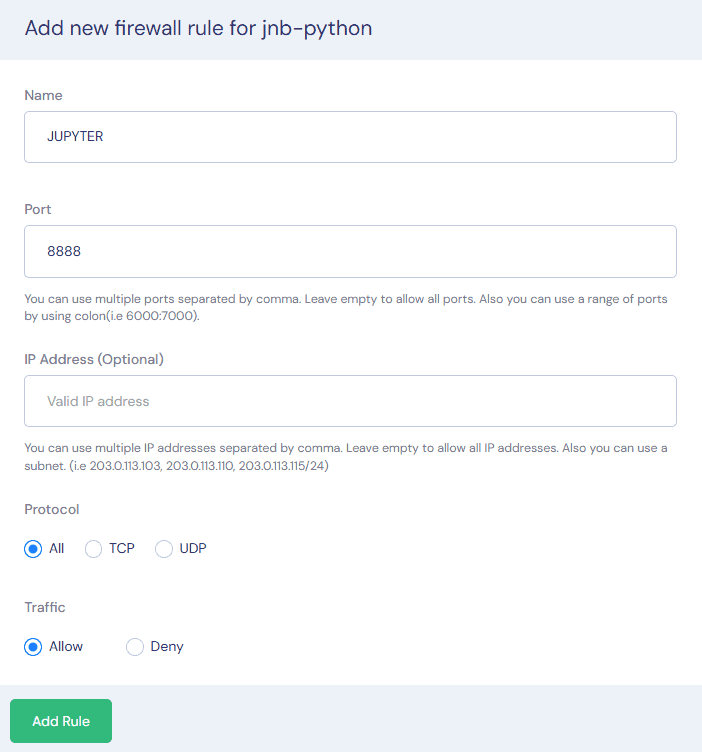
Set Up Data Persistence (Volume)
Data resets after a container restart, so code files must be stored in the host's physical directory. Use Commands again to create the directory:
mkdir -p /home/master/jupyter_data
chmod 777 /home/master/jupyter_data
(Note: To avoid permission issues, loose permissions are granted here temporarily. In practice, configure this based on User ID.)
Execute Docker Run Command
Next, create a new Command to start Jupyter. We use the official jupyter/scipy-notebook (which includes more scientific computing packages).
docker run -d -p 8888:8888 --name my-jupyter -v /home/master/jupyter_data:/home/jovyan/work --restart unless-stopped -e JUPYTER_ENABLE_LAB=yes quay.io/jupyter/scipy-notebookCommand Parameter Analysis:
docker run
The basic command, meaning “Create and start a new Container from an Image“.-d- Meaning: Run in background (Detached Mode).
- Effect: Without this parameter, the terminal screen will be occupied by Jupyter’s Log messages, and Jupyter will stop if the window is closed. With this parameter, it runs silently in the background, allowing us to continue entering other commands.
-p 8888:8888- Format:
<Host Port>:<Container Internal Port> - Meaning: Map the server’s external Port to the container’s internal Port (Port Mapping).
- Effect:
- Left 8888: The port opened to the outside on the xCloud host (Nginx forwards traffic here).
- Right 8888: The port Jupyter program listens to by default inside the container.
- Application: If you want to run two Jupyters on the same machine, the second one can be changed to
-p 8889:8888.
- Format:
--name my-jupyter- Meaning: Name the container for easier management.
- Effect: If unnamed, Docker assigns a random code. Naming it allows convenient management commands like
docker stop my-jupyterordocker logs my-jupyter.
-v /home/master/jupyter_data:/home/jovyan/work- Format:
<Host Real Path>:<Container Internal Path> - Meaning: Directly “mount” (map) a folder from the server’s hard drive into the container.
- Effect: Set up data persistence; since data resets on container restart, this is key to data preservation!
- Left
/home/master/jupyter_data: The actual folder on the xCloud host. All.ipynbcode files will physically exist here. - Right
/home/jovyan/work: The default working directory seen inside the Jupyter container (jovyanis the default username in the Jupyter Docker image). - Result: Even if you delete and recreate this Docker container, as long as
/home/master/jupyter_dataexists on the host, previously saved code will not be lost.
- Left
- Format:
--restart unless-stopped- Meaning: Ensure Jupyter automatically restarts after a server reboot or Docker crash.
- Effect: Tells the Docker daemon to try restarting this container automatically unless it was manually stopped using
docker stop.
-e JUPYTER_ENABLE_LAB=yes- Effect: Use the newer JupyterLab interface (IDE-like, with file explorer, tabs) by default upon startup, instead of the old Jupyter Notebook interface.
quay.io/jupyter/scipy-notebook- Meaning: Specify the Image Source.
- Detail:
quay.io: The image Registry, similar to GitHub.jupyter/scipy-notebook: The officially maintained image version. Besides the basic Python environment, it comes pre-installed with common scientific computing packages like Pandas, NumPy, SciPy, and Matplotlib, saving extrapip installtime.
After execution, verify that the Status displays Completed.

Step 3: Create Blank Site and Cloudflare SSL Setup
Jupyter uses HTTP by default and runs on port 8888; directly exposing the IP and port is neither secure nor professional. We will use xCloud's Blank Site to handle domain resolution and SSL.
Create a Blank Website in xCloud
- Switch to the Site List tab and click + New Site.
- Select Custom PHP → Blank Site (do not install sites containing applications).
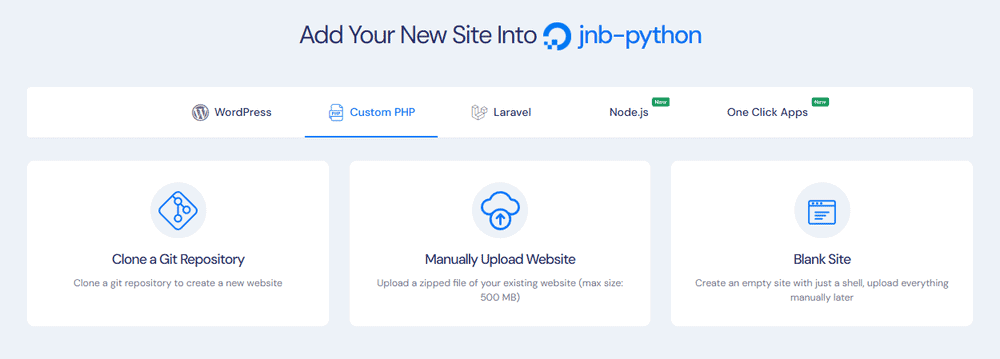
- Select Setup into a New Domain
- New Site Title: Enter the website name (e.g.,
jupyter-app). - Domain Name: Enter the subdomain you want to use, such as
jupyter.domain.com. - Add DNS and SSL Certificate on Cloudflare: Enable this option for xCloud to complete DNS and SSL configuration directly via API on Cloudflare.
- New Site Title: Enter the website name (e.g.,
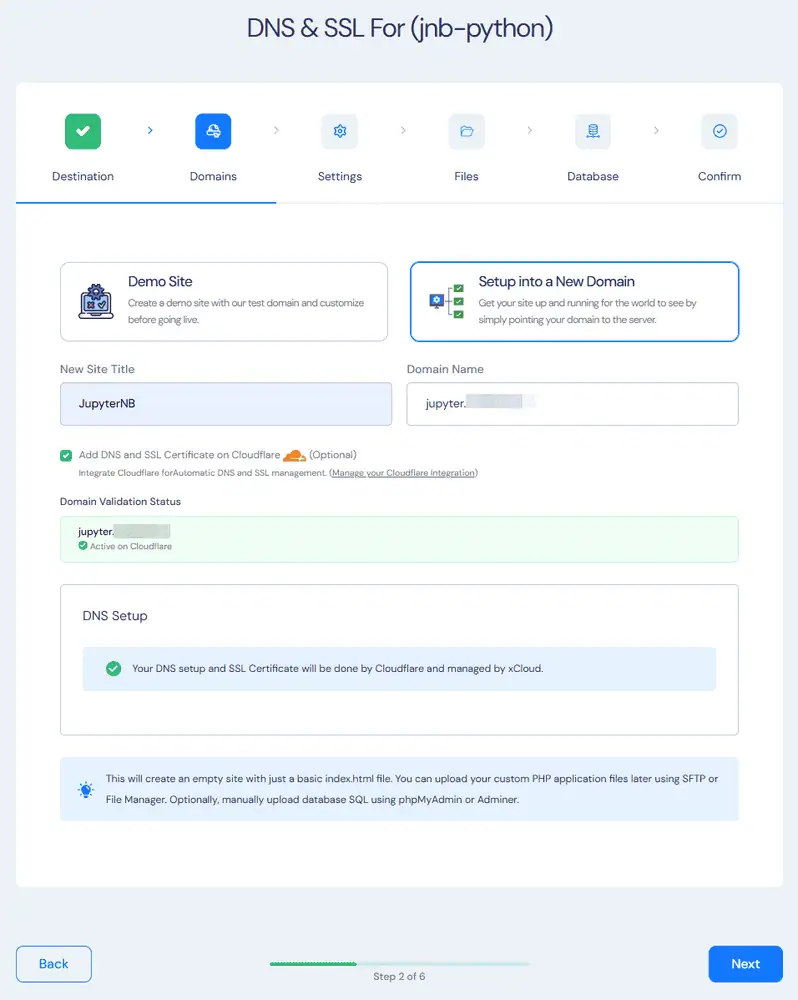
- Select No Database for Database. Keep the PHP version and Web Root as default; Nginx will forward the traffic and won't read this directory.
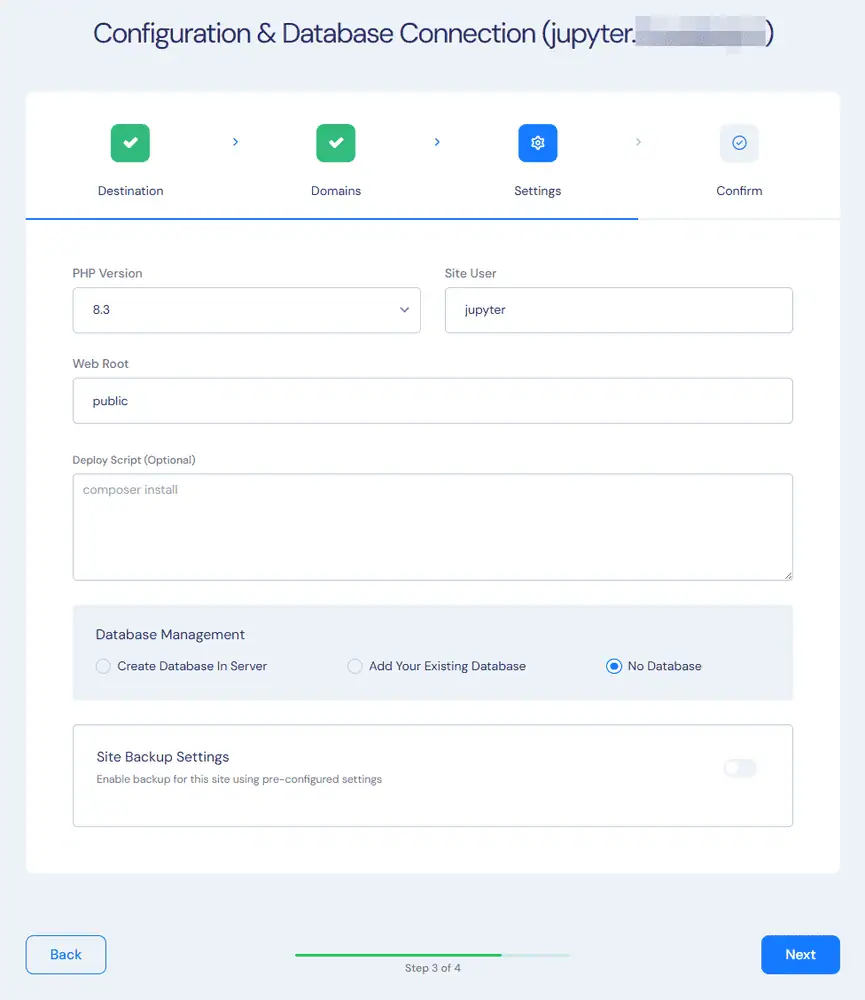
- Confirm everything is correct and start creation; deployment takes about two minutes.
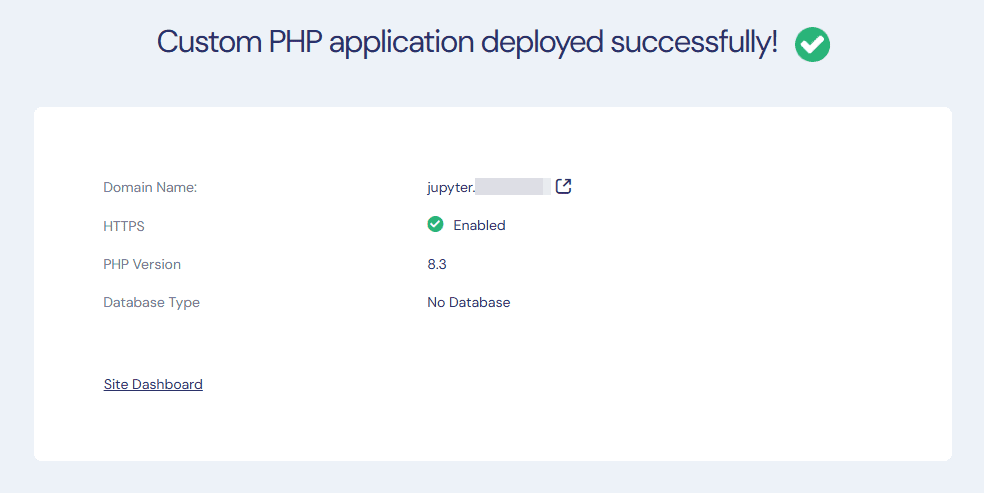
Cloudflare Integration and Automated HTTPS Issuance
This is one of the greatest conveniences brought by xCloud.
In the Site Dashboard left menu, select Domain → SSL/HTTPS. If Cloudflare API integration is set up, the system automatically issues an Origin Certificate and enforces HTTPS redirection.
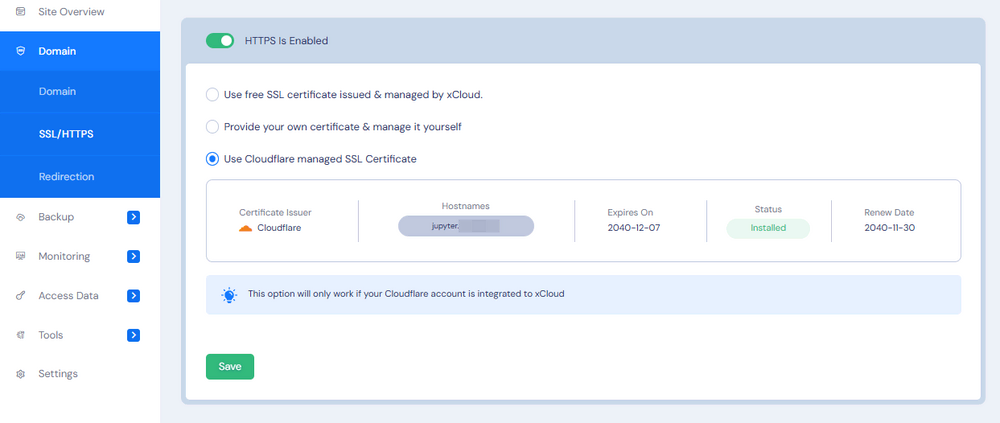
At this point, visiting https://jupyter.domain.com will show a 403 Forbidden error. This means the SSL and Nginx basic connections are working, and only the reverse proxy needs to be configured.
Step 4: Configure Nginx Reverse Proxy
We need to modify the Blank Site's Nginx settings to forward all traffic to localhost:8888.
- Select Tools → Nginx Customization in the Site Dashboard.
- Click Add a New Config, and select Inside Server Block for the Config Type location.
- Since xCloud currently doesn't provide a blank Nginx config, enter the following Nginx rule using Regex (
~) to overwrite the default path:
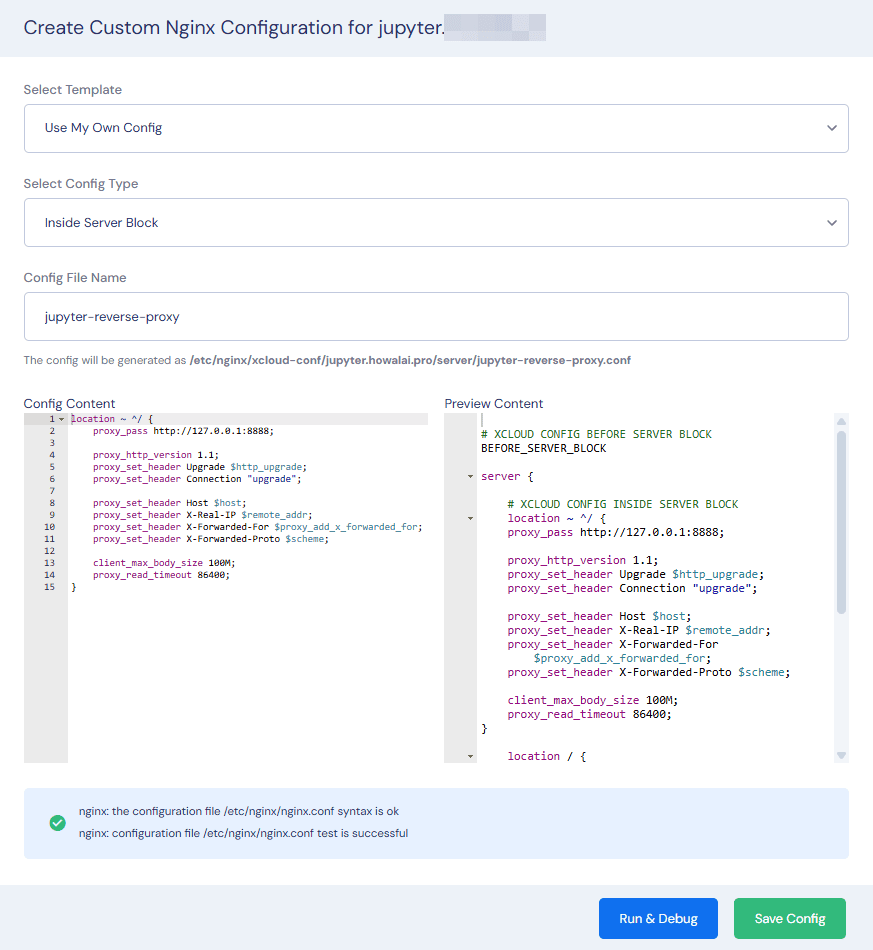
location ~ ^/ {
    proxy_pass http://127.0.0.1:8888;

    proxy_http_version 1.1;
    proxy_set_header Upgrade $http_upgrade;
    proxy_set_header Connection "upgrade";

    proxy_set_header Host $host;
    proxy_set_header X-Real-IP $remote_addr;
    proxy_set_header X-Forwarded-For $proxy_add_x_forwarded_for;
    proxy_set_header X-Forwarded-Proto $scheme;

    client_max_body_size 100M;
    proxy_read_timeout 86400;
}
Key Configuration Explanation:
- WebSocket Support: Jupyter Notebook operation relies on WebSockets to maintain Kernel connections. The
UpgradeandConnectionheaders must be added; otherwise, the Notebook will open but cannot execute code (Kernel Disconnected). - Proxy Pass: Points to the local port 8888 mapped by Docker.
Click Run & Debug to test the syntax. If there are no errors, click Save Config, and the system will automatically restart the Nginx service.
Step 5: Get Login Token and Test Development
Open your browser and visit https://jupyter.domain.com. You should see the Jupyter login screen requesting a Password or Token.
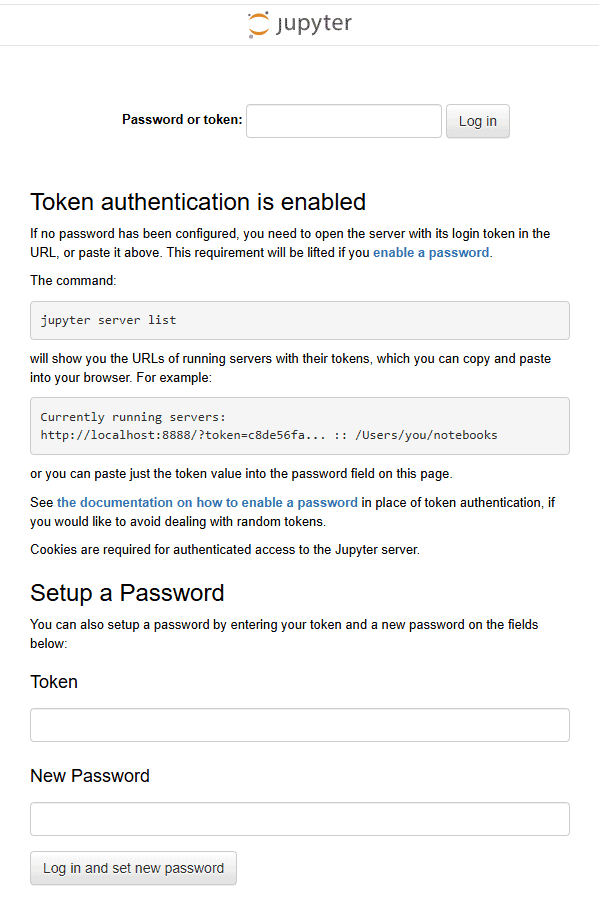
Since this is the first launch, you need to retrieve the default Token from the Docker Log.
Retrieve Access Token via Logs
Return to Management → Commands in the server management interface and create a query command:
docker logs my-jupyter 2>&1 | grep "token="
In the execution result, copy the long code following token=.
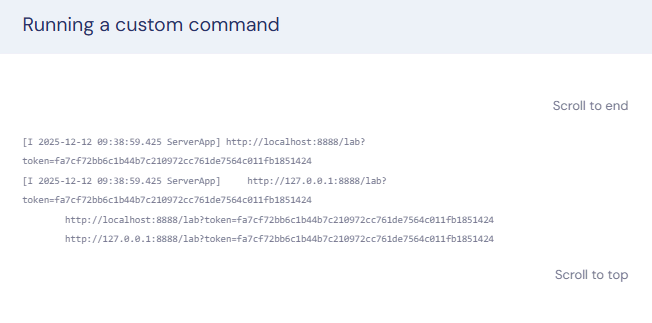
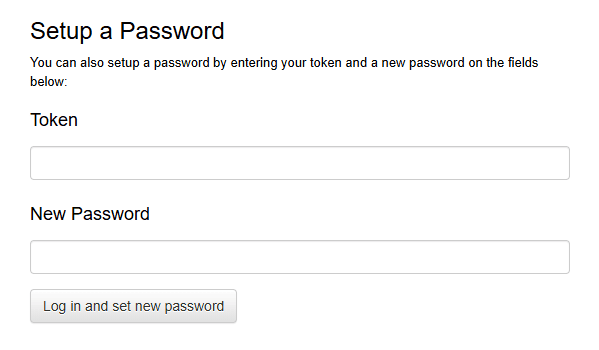
Set Password and Start Using
Return to the browser and paste the Token into the login box. For easier future logins, it is recommended to set a fixed password in the "Setup a Password" field below.
After successful login, you will see the /work directory. Try creating a new Python 3 Notebook, enter print("Hello Quants Note"), and execute. If the result outputs successfully, the WebSocket connection is normal, and the environment deployment is complete.
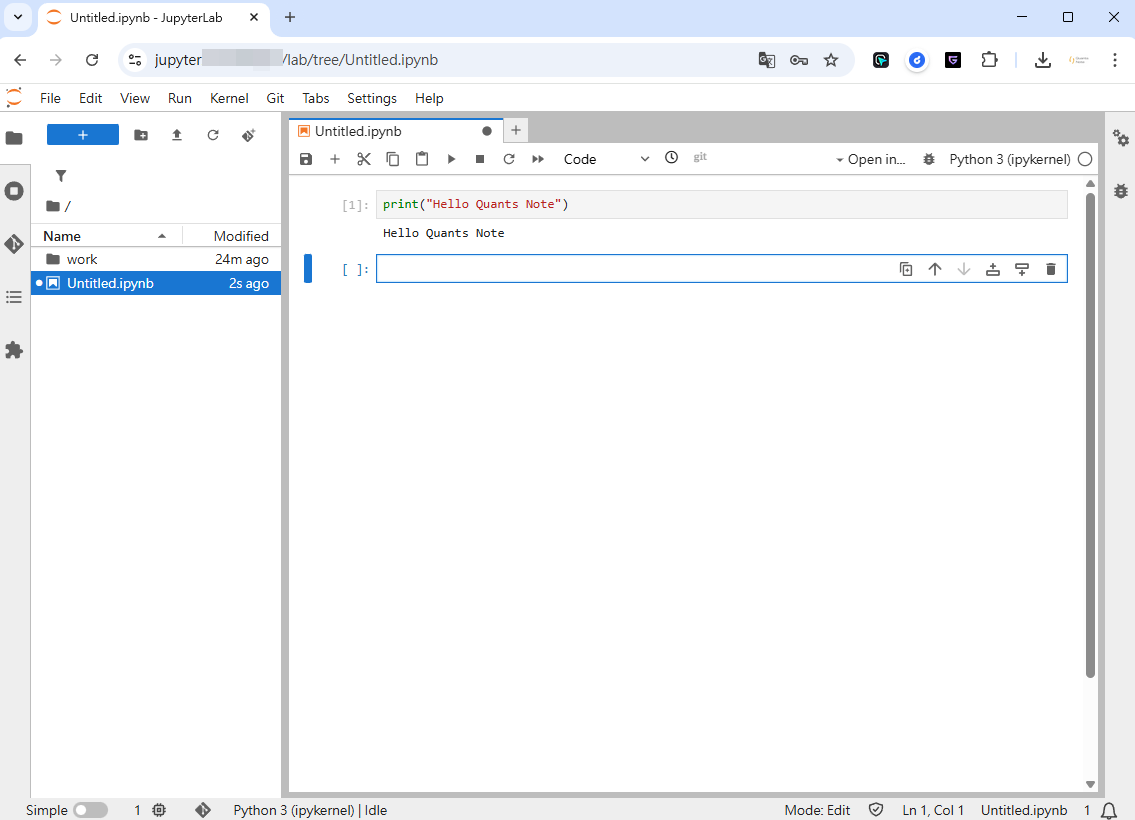
Step 6: Performance Tuning and Routine Maintenance
Disable Unnecessary Services to Save Memory
If you are using a host with lower specifications, don't forget to disable services that are not used in this technical architecture. From the left menu Management → Settings, in the service list, click the Disable button under Action for any unnecessary services.
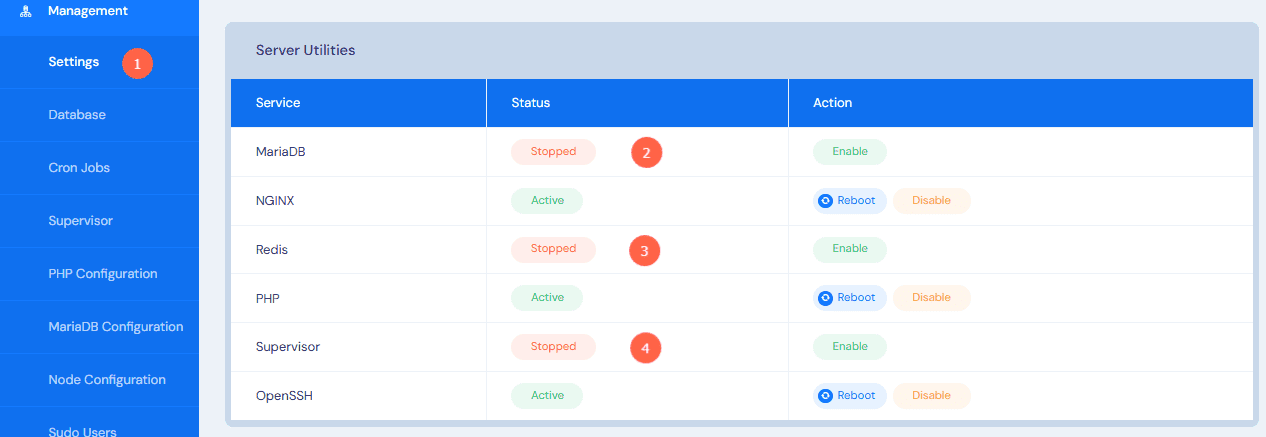
Following our steps, the services that can be disabled include:
- MariaDB (Database): One of the significant memory consumers; it typically uses over 100MB of RAM even when idle.
- Redis (Cache): Redis is used to cache data in memory to speed up website loading (Object Cache). For a real-time computing environment like Jupyter, or a simple reverse proxy, it will only consume extra RAM.
- Supervisor: Usually used to manage PHP background queues (Queue Workers), such as sending emails or processing large images. If only running Jupyter, this service is redundant.
Overall, this can free up about 130MB of memory and a small amount of CPU resources.
Set Up Cron Jobs to Manage Docker
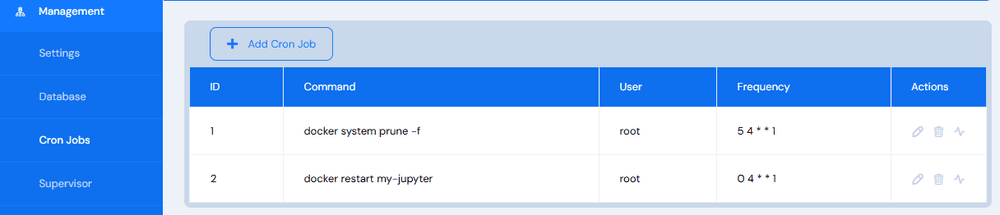
From the left menu Management → Cron Jobs, click the + Add Cron Job button to add two automated scheduled tasks.
- Automatically restart the Jupyter container every Monday at 4:00 AM (to free up memory and solve host performance issues)
0 4 * * 1 docker restart my-jupyter - Automatically clean up unused Docker junk every Monday at 4:00 AM (to prevent storage space from gradually shrinking)
5 4 * * 1 docker system prune -f
Deployment Efficiency and Time Cost Analysis
Compared to traditional manual SSH configuration (installing Python, Virtualenv, Nginx Config, Certbot SSL), the solution using xCloud combined with Docker significantly improves efficiency. Here is the time cost breakdown for this practice:
| Deployment Stage | Estimated Time | Description |
|---|---|---|
| Host & Docker Initialization | 10 Mins | Includes Droplet creation, system updates, and automated Docker installation |
| Container Deployment | 5 Mins | Downloading Image and starting Jupyter, no compilation or dependency handling needed |
| Site & SSL Config | 3 Mins | xCloud automatically handles DNS resolution and Cloudflare certificates |
| Nginx Reverse Proxy | 2 Mins | Applying the pre-configured Config template |
| Total Time | Approx. 20 Mins | Saves about 60% of time compared to manual deployment |
This workflow standardizes tedious system management, allowing quantitative traders to reserve their core energy for strategy development rather than environment maintenance.
💡 Environment Setup Complete, What's Next?
With a powerful cloud computing environment, you have completed the first piece of the quantitative trading puzzle. Next, you need proven strategy logic and backtesting tools.
If you don't want to write code from scratch, we invite you to join our "Python Options Quantitative Trading in Action: From Strategy Principles to Visual Backtesting" course.
In the newly added chapters of this course, we directly provide:
- Complete
BacktestEngineSource Code: Includes data caching and daily P&L settlement features. - 3D Risk Visualization Dashboard: Allows you to analyze strategies in real-time via sliders within Jupyter Notebook.
You can directly upload the Python Strategy Lab files provided in the course to your newly set up xCloud Jupyter Notebook, and immediately start backtesting assets like SPY and NVDA to validate your trading ideas!
👉 Click here for course details and limited-time offers
Conclusion
Through the practical walkthrough in this article, we have successfully simplified complex server maintenance work into a standardized Docker deployment workflow. This architecture is not only suitable for Jupyter Notebook, but in the future, you can also use the same logic to deploy quantitative trading bots or market monitoring dashboards.
We hope this article helps you clear the obstacles of environment setup and immediately start your quantitative development journey.
xCloud Cloud Control Panel
☆BFCM LTD Plan☆
Additional 10% Server Discount for LTD Users